A lot of our clients end up managing multiple email addresses. One for home, one for work, one for their side project, etc. Most only want to have to check one inbox, but be able to send from any address. That’s where Gmail comes in.
How to Do It
The method we typically recommend (and use ourselves) is pretty easy to set up…
- Set-up a free Gmail account – Pick a username that includes your name or site/business name in case you accidentally send from it. That way your contacts don’t get an email from chunkymonkey729@gmail.com that has your signature.
- Forward mail from existing addresses to Gmail account – Almost all email services allow you to set up email forwarding. Most of the time, it’s really easy to find under Settings or Tools or it can be set by your developer when the address is created. If you don’t see it, a Google search will probably tell you how.
- Organize your Gmail inbox – Depending on how many addresses you’re using, you may need to organize your inbox some. If not, skip to #4. In Gmail, you organize your mail using Labels and Filters. Click the cog in the upper right corner and choose Settings, the Label tab, and then the Create New Label button. Name it and click Create. Now, click the Filter tab, then Create New Filter at the bottom. In the To box, type in the address you want to filter, and hit Create filter with this search. Check Apply the label, pick your label from the dropdown and click Create filter. Now the filter should show on the left and will contain messages sent to that address. That’s the easiest way to organize your box based on email addresses, but Gmail allows for so much more so play with it and use it to make your life easier.
- Allow sending from other addresses – The best part about this set-up is how easy it is to allow sending from all your addresses. Click the cog in the upper right corner and choose Settings, then the Accounts tab. Under Send Mail As, click Add another email address you own. Enter your info and uncheck Treat as Alias. Click Next, leave Send through Gmail selected, click Next, then Send Verification. That will send you an email for you to confirm that will allow sending as that address. Repeat for all your addresses.
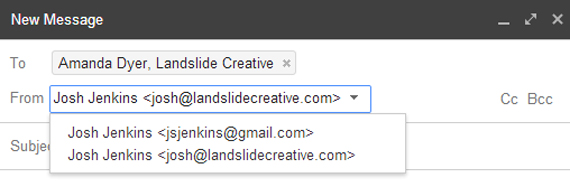
- Start emailing – Now when you compose a message, there will be a dropdown where you can select which email you want send from. It’s as easy as that.
*We recognize that it’s possible to do all this through a mail app like Outlook or Mail as well, but it’s really nice to be able to access it on any computer or device without having to set it up separately on each one.
DISCLAIMER: Although we have never experienced a problem, it’s possible that spam filters could catch messages sent from an aliased address.
